What’s in this Post
Exposure Modes
 As I mentioned in one of my other articles, exposure is everything in photography. What I’m going to talk about in this article are exposure modes. The ways camera makers speed up the process of selecting the correct exposure.
Basic Modes
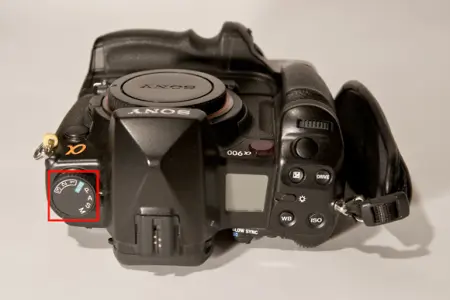
Most modern-day cameras have a number of modes, or settings, that assist the photographer in obtaining the correct exposure. In other words, they are the means to set the exposure triangle (Aperture, Shutter-Speed, ISO) for a given situation. Here are some basic modes:
- Manual Mode
- Aperture Priority Semi-Automatic Mode
- Shutter-Speed Priority Semi-Automatic Mode
- Program Mode
Some cameras have even more, but these are specific instances, or variations, of the ones listed.
Manual Mode
This mode requires you to set all three of the exposure triangle elements. It is by far the slowest to set, but it gives the most precise control. You start by setting the ISO, select a shutter-speed, then lastly, adjust the aperture so that the camera’s light meter is in the middle. You can start the process with any element in the exposure triangle.
Aperture Priority Semi-Automatic Mode
Around the mid-eighties, camera manufacturers created a mode called semi-automatic. The idea was to set two of three exposure triangle elements in advance, and the camera would automatically set the last one as you depressed the shutter button to capture an image.
This semi-automatic mode requires you to set Aperture and ISO, then determines the Shutter-Speed automatically.
This mode is useful when you know the depth of field you want (aperture) for an image, and aren’t as concerned about the Shutter-Speed. For example, this is the mode I use when I’m shooting wildlife. I’m very concerned about depth-of-field (I normally choose f/6.7), but not usually concerned about Shutter-Speed.
But don’t ignore it. In some low light situations, you could get a Shutter-Speed so slow that you can’t hand-hold the shot.
Shutter Speed Priority Semi-Automatic Mode
This requires you to set Shutter-Speed and ISO, then determines the Aperture automatically.
This mode is useful when you know the Shutter-Speed you want for an image, and aren’t as concerned about the Aperture (depth-of-field). For example, this is the mode I use when I’m shooting sports. I’m very concerned about stopping the action, (I like to choose something like 1/300 of a second) but not usually concerned about Aperture (depth-of-field).
But again, don’t ignore it. In some low light situations, you could get an Aperture so large (narrow depth-of-field) that some of your subject becomes out-of-focus.
Fully-Automatic Program Mode
This mode was created a few years after the semi-automatic modes. You don’t set anything. Essentially, you have a point-and-shoot camera. Why not? If semi-auto is faster, wouldn’t full-auto be faster still?
Well, in a word, yes, but there is a price.
In any given situation, the settings chosen by the camera may not be identical from shot to shot. How can that be? Through the sensor, various light levels are determined. This pattern is then compared to an internal database of patterns that tell the camera what settings to choose for that particular shot. The problem, light in a particular situation can change slightly from moment to moment, even in a closed situation like a studio. This, in turn, can change the camera’s setting selection.
Admittedly, these changes are most often subtle. But they can have an effect.
Conclusion
Unlike most techniques, Exposure Modes must always be used. It is up to you which you’d like to use. Keep in mind, they must be used correctly, if you want to get properly exposed images.

Dave’s Newsletter
Discover the thrill of the great outdoors on my adventure website. Explore breathtaking hiking trails, conquer rugged terrain on your mountain bike, or capture nature’s beauty with your camera. All from your inbox. Adventure awaits!